Raised Platform Under the Windows of an HDB Living Room in Singapore: Height, Edge Lighting and What to Settle Before the Carpenter Builds
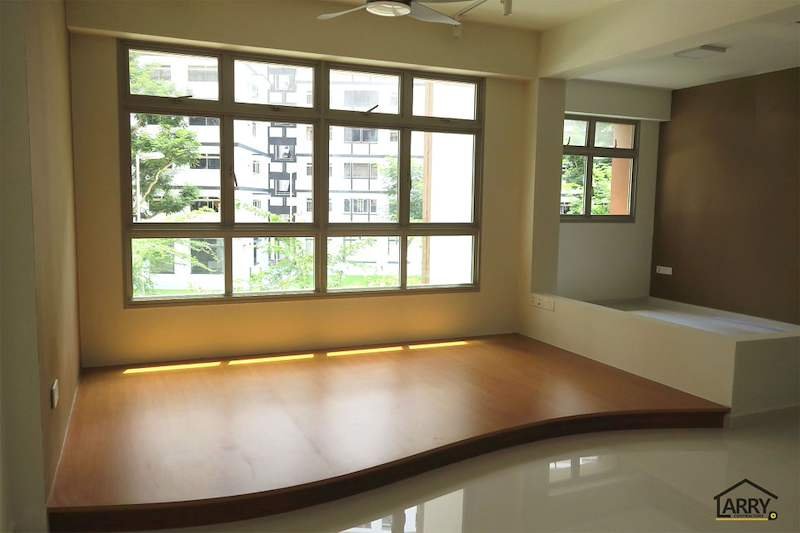
Pictured above: a curved timber-laminate platform running under the full-width windows of an HDB living room, with a strip of light along the window edge and a ceiling fan overhead, from our project archive (C20). The platform is a piece of carpentry, fitted after the floor is done. Where it starts, how high it stands and what runs through and around it were all decided on paper weeks before.
A raised platform under the living room windows is one of the most requested shapes in an HDB flat. It gives a reading seat, a play area, a place for guests to sit and, if it is built with drawers or lift-up lids, a lot of storage that does not need a wall. It is also a piece of carpentry that owners picture as a simple box. Then the flat is built, and the power point that was on the wall at floor level is now buried, the window handle clashes with the cushion, the edge is the wrong height for the sofa beside it, and nobody can say how to reach the light strip when it stops working.
This guide is for an HDB owner who is about to ask a carpenter to draw a platform. It uses only what this site already publishes: the carpentry is made in our own Singapore factory, platform beds sit on our list of carpentry we build, and the published 4-room programme says when carpentry goes in. It gives no price for a platform, because we do not publish one. What it covers is the part a contractor can walk you through before the drawing is signed.
The short answer
Decide five things on the drawing before the carpenter builds anything: what the platform is for, how high it stands and what that height does to the windows and the room beside it, where the power and the light strip are wired, how the storage opens, and how every part of it is reached later. Then check the plan against the programme: wiring behind and around the platform is done in weeks 2 to 3, and the platform itself is fitted in weeks 6 to 7. A change after the plan is signed is a variation order, so the decisions belong on the drawing, not on the site.
Step one: say what the platform is for
The same shape does three very different jobs, and each one changes how it is built.
- A seat or a reading corner. People sit on the edge and lean on the window side. Depth and the cushion matter more than storage, and the edge you sit on is the edge that gets scuffed first.
- A play area. Soft landings, rounded corners and a low step matter. Think about where a child will climb up and where he or she will fall down.
- Storage. Drawers pulled out to the side, lids lifted from the top, or both. The way the storage opens decides how much floor you must leave clear next to it.
Write the main use on the plan, then the second use. If the answer is "a bit of everything", choose the one that must work best and let the others take second place. A platform that is a bed, a play area and a sofa all at once usually does none well.
Step two: the height, and what it does to the windows
A platform under windows changes how the windows are used. Before the height is fixed, stand where the platform will be and open each window the way you actually open it.
- Does the sash still swing? A window that opens outward or that has a handle low on the frame may foul a cushion, a lid or a person sitting against the glass. Test every window above the platform, not just the biggest one.
- Where does the handle sit? Reaching it should not mean kneeling on the platform in shoes or leaning over a lid.
- Do you still want the view? A platform raises your eye level. Check the window sill against the new seat height on site.
- How does it meet the next piece? At the edge of the platform you step down onto the floor or onto the next room's finish. A very small step is the one people trip on, so decide the step height deliberately and mark it on the drawing.
- The window itself is not a carpentry job. If you are also thinking of changing the windows, read why window replacement belongs to an approved window contractor and sequence it before the platform is made, not after.
We do not publish a standard platform height, and we have not put one here. It depends on the room, the windows and what the platform is for, and it is settled on the drawing at a site visit.
Step three: power points and lights, decided before the wall is closed
This is the step that is most often missed, because the electrical work happens long before the platform exists. On the published 4-room programme, masonry, plumbing and electrical work (described as full rewiring) fall in weeks 2 to 3. The carpentry comes in weeks 6 to 7. So the wiring has to be placed for a platform that is not there yet.
- Existing points at floor level. A power point on the wall under the window ends up inside or under the platform. Decide whether it should be moved to the side of the platform, up the wall above it, or to a place the platform leaves clear.
- New points. Where will a lamp, a laptop or a phone charger sit? Mark the positions on the plan. Cutting an opening in a finished platform side for a socket is possible, but it is a job on its own. Our post on the TV console wall goes through the same logic for a wall.
- The light strip. A strip of light along the window edge, as in the picture, needs a power feed to the strip and a control for it. Decide whether it is on its own switch. Our post on light points and switches explains why each lighting job should get its own control.
- Wire routes. Ask where the wire runs and how it is protected inside the platform, especially if there are drawers that slide past it.
- Services under the platform. If anything that may need to be reached sits near the platform, such as an aircon pipe route, a water shut-off or an electrical board, tell your contractor so it is not boxed in.
The wiring itself is done by or under a licensed electrical worker, as we explain in our post on electrical work and the licensed electrical worker.
Step four: how the storage opens
The same footprint holds very different amounts depending on how it opens, and the choice also decides how much clear floor you need.
- Drawers on the side. Easy to use, but each drawer needs its full length of free floor in front of it. If a sofa or a table will stand there, the drawers behind it are decoration. The bedroom platform in the same flat has its drawers along an open edge, with floor left clear in front of them.
- Lift-up lids. Good for bulky things used rarely, but you cannot sit on a lid while it is open, and what is stored first goes to the bottom. Ask how the lid is held open and what keeps fingers clear.
- A mix. Drawers where you walk up to it, lids where you sit.
- A fixed section. A platform does not have to be hollow everywhere. Ask whether a section should stay closed so the edge is firm where people sit.
Ask for the number and size of drawers or lids to be written on the drawing, with the direction each opens. Handle style matters here too: a handle that sticks out at floor level is a handle people catch their feet on, which is why the handles on our bedroom platform drawers are cut into the drawer front.
Step five: the edge, the curve and the finish
The platform in the picture has a curved front. A curve looks soft and keeps a walkway open, but it is a different job from a straight edge: it takes more shaping in the factory and the shape has to be measured on site.
- Straight or curved. A curve is a design decision, so ask for it to be priced as a separate item so you can compare it with a straight edge. We do not publish a price for it.
- Finish. The platform here is in timber-laminate. Decide whether the same finish runs across the top, the face and the step, or whether the top is something else. The top is the part that gets worn, so ask what it is made of and how it is cleaned.
- Edge protection. Where the platform edge meets a hard floor, ask how the edge is finished, because that is where knocks and wear come first.
- The floor underneath. Ask whether the floor tiling continues under the platform or stops at its edge. It changes how much floor is tiled, and a platform that is removed later leaves the floor under it to deal with.
Step six: how every part is reached later
A platform is a closed box, and closed boxes hide things. Ask three questions of the drawing before you sign it.
- If the light strip stops working, how is it reached?
- If a power point inside or beside the platform needs to be checked, how is it reached?
- If a drawer or lid mechanism fails, can it be replaced without taking the platform apart?
Our post on what a false ceiling hides makes the same point for the ceiling: a hidden part with no way to reach it is a job that costs more than it should.
Where it sits in the programme
On our published 4-room programme, a full renovation runs like this.
- Week 1: hacking and demolition.
- Weeks 2 to 3: masonry, plumbing and electrical. The points and the light strip feed are wired here.
- Weeks 4 to 5: waterproofing, tiling and ceiling.
- Weeks 6 to 7: carpentry installation. Factory-built kitchen cabinets, wardrobes and consoles are fitted on site, and the platform goes in with them.
- Week 8: painting, doors and hardware, deep cleaning and handover walkthrough.
Two things follow from this. The platform has to be drawn before week 2, because the electrician must know where the floor will rise. And because the platform is made in the factory and fitted in weeks 6 to 7, the measurements are taken after the walls and floor are finished, so ask when the carpenter will measure. The same ordering logic is in our post on the order of works, and our post on variation orders explains what happens when you change your mind after the plan is signed.
The same idea in the bedroom
The same flat has a raised platform in the bedroom too, with a row of white built-in drawers along its edge. The point is the one above: a platform with drawers works when the floor in front of the drawers is left clear and the handles are flush. For wardrobes beside a platform, see our post on a built-in wardrobe in an HDB bedroom.
Questions to put on the quotation and the drawing
- What is the platform mainly for, and what is the second use?
- What is its height, how high is the step down, and is it marked on the drawing?
- Does every window above it still open fully, and can the handle be reached?
- Which existing power points does it cover, and where are they moved to?
- Where are the new points and the light strip, and what controls the strip?
- How many drawers or lids, how big, and in which direction does each open?
- Is the front straight or curved, and is the curve priced as a separate line?
- What is the top made of, and how is the edge finished?
- Does tiling run under the platform?
- How is the light strip, a point or a mechanism reached if it needs repair?
- When will the carpenter measure on site?
What to do this week
- Stand where the platform will go, open every window, and note which ones the platform would affect.
- Write down the main use of the platform and where the family will sit, play or store things.
- Photograph every power point under the windows and mark the ones the platform would cover.
- Decide whether you want a light strip and whether it should be on its own switch.
- Take the plan to your contractor before first fix and ask for the points, the light feed, the drawers or lids and the step height to be shown on one drawing.
We are an HDB Licensed Renovation Contractor, HB-09-5667H. Planning a platform? WhatsApp us on 9107 2601 with your flat type, your estate and the room, and we will arrange a site visit to go through it with you. Any price depends on that visit. The published programme is on our 4-room HDB renovation cost page, you can see more of this flat in our project photos, and our other services are on the HDB renovation contractors page.
Related reading: light points and switches · TV console wall · windows and approved window contractors