
TV Console Wall in an HDB Living Room in Singapore: Points, Bracket Backing and Console Height to Fix Before the Wall Closes
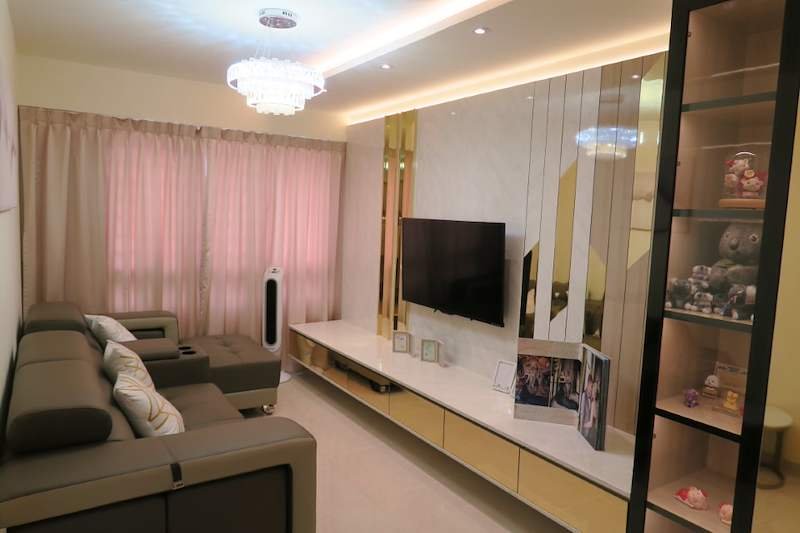
Pictured above: a living room from our project archive (C10). The TV is wall-mounted on a feature wall with mirror strips, a long floating console runs under it, and the ceiling above carries cove lighting. Every one of those pieces is fitted late in a renovation. The sockets, the cable route and the solid backing behind the TV are not: they are decided weeks earlier, while the wall is still open.
Most owners choose the TV last. The wall is finished, the console is built, and the TV arrives in a box. Then the questions start. Where does the power come from? The socket sits at the far end of the wall. Where does the cable go? Down the face of the wall, in plain sight. Will the bracket hold? Nobody knows what is behind the surface. None of this is hard to settle early. All of it is expensive to settle late, because the answer is inside a wall that has already been paid for.
This guide is for an HDB owner planning a TV wall with a floating console during a renovation. It uses only the rates and the programme already published on this site. It does not tell you which TV or bracket to buy, and it gives no price for your wall, because that depends on your flat and on what you choose to put on it. What it covers is the part a contractor can tell you: what has to be settled, in which week, and what to ask before the wall is closed.
The short answer
Decide the TV before the wiring starts, not after the console arrives. Put the sockets and the data point where the TV, the console and the boxes will actually be. Ask for an empty pipe for cables to be placed inside the wall. Ask what is behind the surface where the bracket will be fixed, and have the backing made solid before the wall is finished. Then draw the console and the TV together, from the height you sit at, before either is built.
Step one: decide the TV and how it hangs
Write these down for your contractor before first fix. None of them needs a shop visit, only a decision.
- Wall-mounted or standing on the console. A wall-mounted TV needs a bracket fixed to something solid. A TV standing on the console needs a socket and cables at console level and no bracket at all.
- The size of the TV, or at least the size you are aiming for. It decides how wide the wall panel has to be and how strong the fixing behind it has to be. Ask the shop for the model's weight and the fixing pattern on its back, and give both to your contractor. We do not publish those figures, because they are different for every model.
- What goes with it. A set-top box, a streaming box, a games console, a soundbar, a router. Each needs power, and some need a cable to the TV. List them now, because each one is an extra socket or an extra cable route.
- Where you sit. The height of the TV and the height of the console depend on your sofa and on your eyes, not on a catalogue. Sit on the sofa you will actually own and look at the wall.
Step two: the sockets and the data point
On our published 4-room programme, masonry, plumbing and electrical happen in weeks 2 to 3, and the programme describes the electrical work in that stage as full rewiring. That is the stage when the TV wall's sockets are put in, and it is the cheapest time to put them anywhere.
- Behind or beside the TV. A socket directly behind a wall-mounted TV lets the plug sit out of sight, but it is only useful if its position matches the bracket and the TV's own socket position. A socket you cannot reach is a socket you cannot switch off.
- At console level. The boxes live on or in the console, so they need sockets there. Count them from the list in step one and add one more.
- A data point. If the TV or a streaming box is meant to be connected by cable rather than by wireless, a data point near it is a decision for this stage. Our room cost calculator lists a data point at $120 each.
- What the standard rates are. The same calculator lists a power point at $90 each, described as a double 13A point, and a light point at $90 each. We do not publish a separate price for a TV point, so ask the electrician for the points on your wall as lines on the quotation, with the number of each. The wiring itself is done by or under a licensed electrical worker, as we explain in our post on electrical work and the licensed electrical worker.
Step three: an empty pipe for the cables you have not bought yet
A TV wall tends to change. A soundbar arrives, the streaming box is replaced, the TV is swapped for a bigger one. If every cable runs on the face of the wall or in a trunking that was added afterwards, each change shows. If an empty pipe runs from the TV position down to the console position inside the wall, a new cable can be pulled through without opening anything.
That is a request, not a promise. Ask your contractor whether an empty pipe can be placed on your particular wall, and where it will start and finish, and have it marked on the drawing. What the wall is made of decides what is possible inside it, so the answer comes from the site visit, not from this post.
Step four: the bracket and what is behind it
This is the one that goes wrong quietly. A wall-mounted TV puts its whole weight on a few fixing points, and the surface that looks like a wall may be a thin finished panel in front of something else.
- Ask what is behind the surface. Is the wall brick, concrete, or a partition built in front of one? Is the feature wall a panel fixed on top? Each answer changes how the bracket is fixed.
- Ask for solid backing where the bracket goes. If the feature wall is built from panels, the backing behind the bracket position has to be solid before the finish goes on. It cannot be added later without taking the panel off.
- Ask which fixings and who decides. Whoever builds the wall should say which fixing holds which weight, and it should match the weight on your TV's own sheet.
- Know where it is safe to drill later. Cables and pipes run inside the wall. When you later hang a shelf or a speaker, the photographs from the end of the electrical stage (see the last step) are what tell you where not to drill.
Step five: the feature wall and the console, drawn together
The wall finish and the console are two different jobs done by different trades, and they meet at the TV.
- The wall finish. Our 4-room cost page puts a feature wall, from laminate through fluted wood, microcement or stone slab, at $1,500 to $5,000. The material changes the weight on the wall, the way the bracket is fixed and how the mirror, stone or panel is cut around the TV, so choose it before the electrical positions are final, not after.
- The console. A floating console is carpentry, and our carpentry rate is $400 per foot run, stated for runs up to 2.6 m high and 650 mm deep. We do not publish a separate price for a TV console, so how yours is measured and priced is for the site visit. Our post on what the foot-run rate covers explains what to ask about height, depth and what is inside.
- Floating means fixed to something. A console that hangs from the wall carries its own weight and whatever is on it. Ask what it is fixed to, and ask for that to be shown on the drawing next to the TV backing.
- Ventilation for the boxes. A box inside a closed drawer has nowhere to lose its heat. Ask the carpenter how the part of the console that holds the boxes is ventilated, and how the cables from them reach the TV.
- Height and depth. The TV's height from the floor and the console's height are the two measurements you will notice every evening. Mark them on the wall with tape at the sofa before the drawing is signed.
Where it sits in the programme
On our published 4-room programme, a full renovation runs like this.
- Week 1: hacking and demolition.
- Weeks 2 to 3: masonry, plumbing and electrical. The sockets, the data point and the empty pipe go in here.
- Weeks 4 to 5: waterproofing, tiling and ceiling.
- Weeks 6 to 7: carpentry installation. The programme says factory-built kitchen cabinets, wardrobes and consoles are fitted on site in these weeks.
- Week 8: painting, doors and hardware, deep cleaning and handover walkthrough.
Three things follow. First, the TV decision has to be made before week 2, about four weeks before the console is fitted, because the sockets and the pipe are placed for a TV that has not been delivered. Second, the console is built in a factory to the drawing, so the TV, the console and the points must all appear on one drawing before it is signed. Our post on when the carpenter should measure explains why measurements are taken late, and the order in which trades follow each other is in the order of works post. Third, anything you change after the drawing is signed is a variation, which our guide to variation orders explains.
Questions to put on the quotation and the drawing
- Which TV, or which size of TV, is this wall drawn for, and have you seen its weight and fixing pattern?
- Where are the sockets and the data point, at what height, and how many of each does the quotation include?
- Is there an empty pipe from the TV position to the console, and where does it start and finish?
- What is behind the surface where the bracket goes, and is the backing solid before the finish is applied?
- What is the floating console fixed to, and is that shown on the drawing?
- How is the part of the console that holds the boxes ventilated, and how do their cables reach the TV?
- Which finish is on the feature wall, and does it change how the bracket is fixed?
- Will I get photographs of the wall before it is closed, and a layout showing the points as installed?
What to do this week
- Decide whether the TV is wall-mounted, and what size you are aiming for. Ask the shop for the weight and fixing pattern of a model you like.
- List every box and device that will sit on the console, and count the sockets and cables they need.
- Sit on your sofa, or one of the same size, and tape the TV outline and the console on the wall.
- Take the list, the tape marks and the model sheet to your contractor before first fix, and ask for the sockets, data point, pipe and backing to be shown on the drawing.
- Photograph the wall at the end of the electrical stage, before it is closed, so you know what is behind it for as long as you own the flat.
We are an HDB Licensed Renovation Contractor, HB-09-5667H. Planning the TV wall? WhatsApp us on 9107 2601 with your flat type, your estate and the TV size you have in mind, and we will arrange a site visit to look at the wall, the points and the console. Any price depends on that visit. The published programme and figures are on our 4-room HDB renovation cost page, you can run the published electrical rates on the room cost calculator, and our other services are on the HDB renovation contractors page.
Related reading: electrical work and the licensed electrical worker · carpentry cost per foot run · order of works