
Dining Area Sideboard and Display Niche in an HDB Flat in Singapore: Socket, Light Strip and Pendant Point to Settle Before Tiling
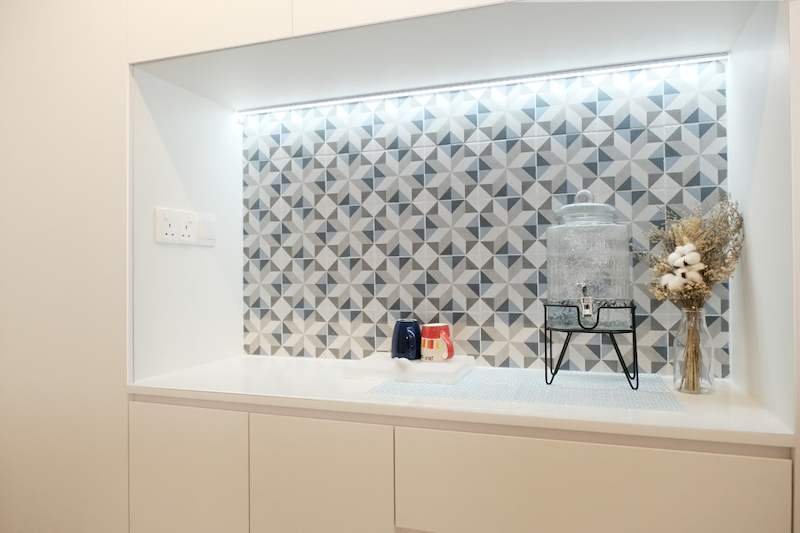
Pictured above: a backlit niche tiled in a blue and white geometric pattern, set above a white sideboard in the dining area of an HDB flat, with a double socket on the side wall and a light strip along the top, from our project archive (407B). In the same flat a geometric pendant hangs over the glass dining table. Every part you see here was wired, tiled or built at a different stage, and each had to be placed on paper first.
The dining area of an HDB flat is often the part that gets decided last. The kitchen gets its drawings, the wardrobes get their drawings, and the dining corner is left as "a table somewhere near the kitchen". Then the flat is built and the pendant hangs well off the middle of the table, the sideboard has no socket for the rice cooker or the water dispenser, and the light strip in the niche has a visible cable because nobody decided where it was fed. All of that is cheap to settle on paper and expensive to settle after the walls are tiled.
This guide is for an HDB owner who wants a sideboard, a display niche or a tiled back panel in the dining area, with a pendant over the table. It uses only what this site already publishes: the programme for a 4-room flat, the electrical rates on the room cost calculator, and the fact that all our carpentry is made in our own Singapore factory. It gives no price for a niche or a sideboard, because we do not publish one. What it covers is the order of decisions.
The short answer
Fix the dining table first, because everything else is measured from it. Then decide where the pendant point goes over the table, which sockets the sideboard needs, whether the niche has a tiled back and a light strip, and how every hidden part is reached later. Wiring is done in weeks 2 to 3 of our published 4-room programme, tiling in weeks 4 to 5 and the sideboard in weeks 6 to 7, so the pendant point, the sockets and the niche feed all have to be on the plan before week 2. A change after the plan is signed is a variation order, so the decisions belong on the drawing.
Step one: fix the table before anything else
A ceiling point cannot be moved to the middle of a table that was never measured. Before the electrician marks anything, decide these and write them on the plan.
- Which table. Choose the table you will really use, or the nearest size you can measure. A glass table with four chairs, as in this flat, takes up a different shape from a long table for six.
- Which way it runs. A table placed along the sideboard wall leaves a different walkway from one placed across the room. Stand where each chair would be and walk the route to the kitchen, to the bedrooms and to the front door.
- Chairs pulled out. Measure your own chairs pulled back, not the table alone. A chair that hits the sideboard or the fridge door when pulled out is a layout fault, not a furniture fault.
- The nearest neighbours. In many flats the dining area sits next to the kitchen entrance or the fridge. Check that a fridge door, a cabinet door and a chair can all open at once.
We do not publish a standard dining table size or a standard clearance, and we have not put one here. They depend on your furniture and your flat, and are settled on the drawing at a site visit.
Step two: the pendant point belongs over the table, not the room
A ceiling point is a place where wiring is brought to feed a light. If the point is placed to suit the room and the table is placed later, the pendant ends up off centre. Our post on light points and switches explains that a light point is the wiring position and the fitting is the light itself, and that the two are chosen and priced separately.
- Position the point from the table. Mark the centre of the table on the floor plan and give that to the electrician. If the table might move later, ask whether the point can be placed to allow for that, or whether a track along the ceiling suits better.
- One pendant or several. A cluster of pendants needs the weight and the cables to be thought through. Ask how the fitting is fixed to the ceiling and what it hangs from.
- The ceiling above it. If the flat gets a false ceiling, the point is wired before the ceiling is closed. Our post on what a false ceiling hides goes through why positions must be decided first.
- Its own switch. The dining light is not the same job as the living room light. Decide whether it has its own control and where you will reach it, near the table or at the edge of the area.
- What it costs. The room cost calculator publishes a light point at $90 each. That is the wiring position only, so ask whether the pendant itself is supplied by you or priced as a separate line.
Step three: sockets for the sideboard, decided as a list
The niche in the picture has a double socket on its side wall. A sideboard in a dining area is where a rice cooker, a kettle, a water dispenser or a charger tends to end up, and a socket cannot be added once the niche is tiled without opening the wall.
- List what will stand there. Write the items down, one per line, and count the sockets they need. Then ask for one more than you can think of.
- Position. A socket inside the niche, on its side wall, is out of sight but may end up behind an object you place later. Decide whether each socket is inside the niche, beside it or under the worktop.
- Power points are a line on the quotation. The calculator publishes a power point at $90 each, the same as a light point. A socket count is therefore a number you can read on your quotation, so ask for it to be written down.
- The fridge. If the fridge is near the dining area, its own socket belongs to the kitchen plan. Tell the electrician so it is not lost between two drawings.
- Who does the wiring. The electrical work is carried out by or under a licensed electrical worker, as we explain in our post on electrical work and the licensed electrical worker.
Step four: the niche, its tiles and its light strip
The niche in the picture is three pieces of work in one: a recess in the carpentry, a tiled back and a light strip along the top. They belong to different trades at different times.
- The tiled back. Tiling falls in weeks 4 to 5 of the published programme, while the carpentry around a niche is fitted in weeks 6 to 7. So the back panel is tiled before the sideboard around it exists, and its size and position come from the drawing. Ask for the niche dimensions to be written on the plan before the tiler starts.
- The light strip. A strip needs a power feed and usually a driver or transformer somewhere. Ask where each one sits and whether it can be reached without taking the niche apart. A hidden part with no way to reach it is a repair that costs more than it should.
- Its own switch. A niche light is often the one you leave on in the evening. Decide whether it has a separate control from the pendant.
- Edges and joins. Ask how the tile meets the carpentry at the sides and the top, and how the worktop edge is finished, because these are the lines the eye goes to first.
- What goes on it. A niche that will hold bottles or a water dispenser wants a surface you can wipe. Ask what the base is made of and how it is cleaned.
The same logic as in our post on the TV console wall applies here: what is behind a surface is decided before the surface is closed.
Step five: the sideboard under the niche
The white cabinets under the niche in the picture are carpentry. All of our carpentry is made in our own Singapore factory and fitted on site, so the drawing is what the factory works from.
- Doors or drawers. Drawers need their full length of clear floor in front. Check this against where the dining chairs stand, since a chair pulled back across a drawer front means the drawer is never used.
- Depth. A deep sideboard narrows the walkway beside the table. Decide the depth from the walkway you checked in step one.
- Worktop. The top of the sideboard is the part that gets used, wiped and scuffed. Ask what it is made of and how the edge is finished.
- Handles. A handle that sticks out catches clothes and bags in a narrow walkway. Ask whether a cut-in or push-open fitting is suitable.
- Services behind. If an aircon pipe, a water shut-off or an electrical board is near the sideboard, tell your contractor so it is not boxed in.
Where it sits in the programme
On our published 4-room programme, a full renovation runs like this.
- Week 1: hacking and demolition.
- Weeks 2 to 3: masonry, plumbing and electrical. The programme describes the electrical work as full rewiring. The pendant point, the sockets and the niche feed go in here.
- Weeks 4 to 5: waterproofing, tiling and ceiling. The niche back is tiled and the false ceiling is closed, so the pendant position is fixed before the ceiling goes up.
- Weeks 6 to 7: carpentry installation. The sideboard and the niche frame are fitted.
- Week 8: painting, doors and hardware, deep cleaning and the handover walkthrough.
Three things follow. The table position must be known before week 2, because the pendant point comes from it. The electrician needs the sideboard and niche drawing, because the sockets and the strip feed are wired before the carpentry exists. And a change after the plan is signed is a variation order, which our post on changing your mind mid-job explains. Our post on the order of works gives the reason each trade goes where it does.
What to do this week
- Measure the table you will use and the chairs pulled out, and mark the table on a plan of the dining area.
- Write down what will stand on the sideboard and count the sockets it needs.
- Decide whether you want a niche, a tiled back and a light strip, and whether each light has its own switch.
- Check the walkway to the kitchen and the bedrooms with the table and the sideboard in place.
- Take the plan to your contractor before first fix and ask for the pendant point, the sockets, the niche size and the light feed to be shown on one drawing.
We are an HDB Licensed Renovation Contractor, HB-09-5667H. Planning a dining area? WhatsApp us on 9107 2601 with your flat type, your estate and the dining area, and we will arrange a site visit to go through it with you. Any price depends on that visit. The published programme is on our 4-room HDB renovation cost page, you can run the published electrical rates on the room cost calculator, you can see more of this flat in our project photos, and our other services are on the HDB renovation contractors page.
Related reading: light points and switches · false ceiling: what it hides · TV console wall