
Bathroom Contractor in Singapore: The Days You Should Be There, From Hacking to the Ponding Test to Handover
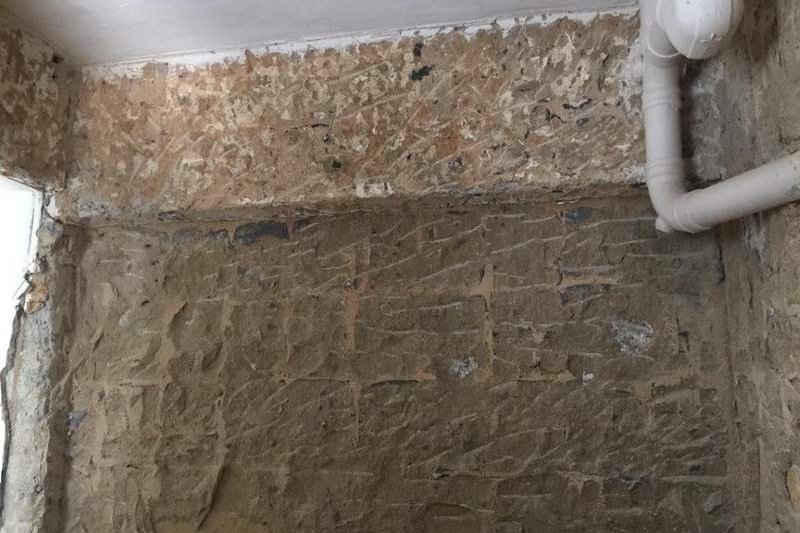
Pictured above: a bathroom wall hacked back to bare brick during one of our HDB projects, with a white waste pipe running along the top corner. This is what the room looks like in the first days of a bathroom job. Everything that goes on top of it, from the new pipework to the waterproofing to the tiles, is hidden within a few days, so these are the days when you can still see what is under the finish.
Most people choose a bathroom contractor by looking at finished bathrooms. That is understandable, and it tells you very little about the part that decides whether the bathroom leaks. A finished bathroom shows you the tiles and the vanity. It cannot show you the membrane under the floor, the slope of the screed or the position of the pipes, because all of that was covered over before the tiler arrived.
The good news is that a bathroom job is short and its stages come in a fixed order. You do not need to stand in the flat for three weeks. You need to be there, or have someone there, on four or five specific days. This guide says which days, what to look at and what to ask. It uses only what we already publish on our bathroom renovation contractor page: the day-by-day timeline, the waterproofing method and the price ranges.
The short answer
- Choose a bathroom contractor for the days you cannot see, not only for the finish you can. Ask how the job is staged and which days you are invited to look.
- Visit 1, end of hacking: the bare floor and walls, the old trap and the pipe positions, before anything is covered.
- Visit 2, after the plumbing and before waterproofing: the new pipes where you agreed them, and a floor that falls to the trap.
- Visit 3, the ponding test: the water on the floor, the level marked, and the time it was started.
- Visit 4, tiling done and before the fittings go in: the tile finished and the pipe stubs where the basin, toilet and mixer will sit.
- Handover: run every tap and the shower, and watch where the water goes.
The programme a bathroom contractor should be able to show you
On our published bathroom timeline, one bathroom takes 2 to 4 weeks, and the typical stages are these:
- Days 1 to 2: hacking. Old tiles, sanitaryware, fittings and false ceiling come out.
- Days 3 to 5: plumbing and electrical re-routing. New waste and supply pipe positions, water heater wiring, exhaust fan rough-in.
- Day 6: waterproofing, two coats of membrane.
- Days 7 to 8: the 24-hour ponding test, a mandatory wait.
- Days 9 to 14: floor screed, wall and floor tiling, grouting.
- Days 15 to 17: sanitaryware, vanity, mirror and accessories.
- Days 18 to 20: false ceiling, lighting, final fittings, cleaning and handover.
That is the typical shape of a job, not a promise for yours. The real dates depend on the flat, the permit and the tile or vanity you choose. But the order does not change, and that is the useful part. If a contractor cannot lay out the stages in this order, or wants to waterproof and tile in the same week, you have learned something before you have signed.
Visit 1: the end of hacking
When the old tiles and screed are off, you are looking at the bathroom as the builders left it. This is the one moment you can see the floor trap, the old pipe positions and the state of the slab. Look at three things:
- Where the pipes actually are. If you plan to keep the toilet where it is, the old waste pipe should be where you expect it. If you plan to move it, this is the day to talk about it with the pipes in front of you. Our guide on what the pipes and the floor allow when moving the toilet goes through what to settle first.
- Whether the old floor trap is staying or going. Our bathroom page describes the right way as hacking down to the slab, re-screeding to a 1:80 gradient and replacing the floor trap, not skimming over the old surface. Ask which of those your quotation says.
- The condition of the old surface. If anything looks unexpected, such as a damp patch or a cracked section, say so now. It is far cheaper to hear about it on day 2 than on day 12.
Take your own photos. You will want them later, and a phone photo of the bare floor with the pipes visible is the cheapest record you can make.
Visit 2: after the plumbing, before the waterproofing
On the published programme, plumbing and electrical re-routing are days 3 to 5, and waterproofing is day 6. The gap between them is the last chance to change a pipe position without redoing anything. What to check:
- The pipe stubs where you agreed them. The basin, toilet and shower mixer positions are drawn on the plan. Check them against the pipes in the wall and floor. Our guide on naming the model before the plumbing days explains why the fittings must be chosen first.
- The slope. The screed should fall towards the floor trap. You can see this by pouring a cup of water on it: the water should run to the trap, not sit in a corner. A floor that falls the wrong way is a common reason for the standing water we write about in our guide to bathroom mould.
- The power points and the exhaust fan wiring. The water heater point and the fan are wired before the walls are tiled, so ask where each one comes out.
Visit 3: the ponding test
This is the visit that matters most, and the one most easily squeezed out of a tight schedule. Our published method is two coats of waterproofing membrane on the full floor and 1.5m up the wet walls, then a mandatory 24-hour ponding test before tiling begins. For what the test is and what HDB says about it, read our guide to the ponding test and what to ask before tiling. The point here is what you can do on the day:
- Be there when the test starts. Look at the water on the floor. Mark the water level on the wall with a pencil or tape, so it can be compared the next day.
- Photograph it with the time. A phone photo carries a timestamp. One at the start and one at the end gives you a record of the 24 hours.
- Come back at the end. If the level has dropped, ask what the contractor does about it. A level that has not moved is what you want to see before anyone starts tiling. Ask for the result in writing, even if it is only a message.
- Look at the height. On our method the membrane goes 1.5m up the wet walls. You can see it as a coating on the wall, and you should see it before it is hidden by tile.
On our bathroom page we say that we document the waterproofing and provide photos as part of the project handover. Whoever you hire, ask for the same: photos of the membrane and of the test, delivered at handover, not promised verbally.
Visit 4: tiling done, before the fittings go in
On the published programme, tiling and grouting run across days 9 to 14, and sanitaryware, vanity and mirror follow on days 15 to 17. In between, the bathroom is a tiled shell with pipe stubs sticking out of it. Check:
- The tile height against what the quotation says. Our standard scope is floor-to-ceiling in the wet zones. If your quotation says half-height, see our guide to where the tile stops and what it really saves.
- Where the tile cuts fall. A tile cut around a pipe or a niche is easy to see now and hard to change after grouting.
- The pipe stubs against your fittings. If the vanity or basin has been chosen, the pipe should come out where the fitting needs it.
Handover: the water test you run yourself
At handover the fittings are on, the ceiling is closed and the cleaning is done. The check that costs nothing is to use the bathroom before you sign. Run the shower for a few minutes and watch the water move across the floor to the trap. Flush the toilet twice. Run the basin tap and look under the vanity for drips. Check that the exhaust fan comes on from its switch. It is the same idea as the handover inspection for the whole flat, applied to one room.
What it costs
The visits cost you a few hours, not money. What a bathroom costs is on our bathroom page: an HDB bathroom is $5,000 to $12,000, and a full hack-and-retile with new toilet, basin, mixer, shower, vanity and waterproofing typically falls between $7,000 and $10,000. Condo bathrooms are $8,000 to $20,000 and landed bathrooms $10,000 to $25,000 and above. Our quotation lists waterproofing, tile cost per square metre, sanitaryware, vanity, accessories and labour separately, and our guide to comparing a bathroom quotation line by line shows how to read one. Where your bathroom sits in those ranges depends on a site visit.
Questions to put to any bathroom contractor
- Can you give me the stages in order, with the day each one starts?
- Which days am I invited to look, and will you tell me the day before?
- Is the floor re-screeded to a fall and the trap replaced, or only skimmed over?
- How many coats of waterproofing, and how far up the walls?
- How long is the ponding test, who checks it, and will I get photos?
- If the water level drops, what happens next, and who pays?
Looking for a bathroom contractor? WhatsApp us on 9107 2601 with your property type, your estate and how many bathrooms, and we will arrange a site visit. Any price depends on that visit. See the published scope and ranges on our bathroom renovation contractor page, the published programme on the 4-room HDB renovation cost page, and more bathrooms in our project photos. We are an HDB Licensed Renovation Contractor, HB-09-5667H.
Related reading: a single-bathroom job: how it is quoted, permitted and scheduled · the ponding test and what to ask before tiling · comparing a bathroom quotation line by line · the contractor's site visit: what to prepare