
Washing Machine and Laundry Area in an HDB Flat in Singapore: Where the Drain, Tap and Socket Must Go Before Tiling
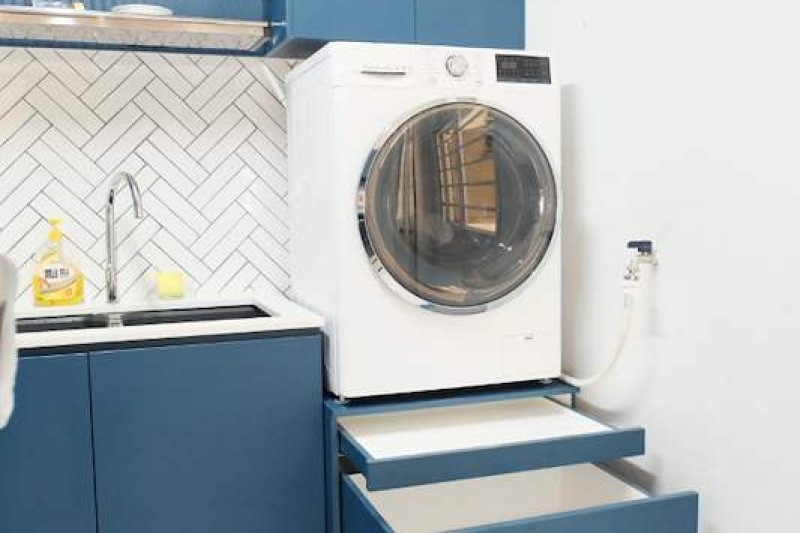
Pictured above: a front-loading washing machine standing on a raised drawer base beside the sink in an HDB kitchen, from our project archive (407B). Look at the wall to the right of the machine: the water tap and the hose are in plain view, and the drawers under the machine pull out. Positions like these are fixed in the wall, the floor and the carpentry drawing long before the machine is carried in.
Most people choose a washing machine the way they choose a fridge: late, and for the features. The renovation has usually finished the walls and floor by then, and the machine goes wherever the pipes happen to be. In a flat that has been renovated without anyone asking where the machine goes, the pattern is familiar. The tap is behind the machine, the waste hose is stretched across the floor, the socket is out of reach, and the only way to fix any of it is to break something that was only just finished.
This guide is for an HDB owner planning the washing machine, or a whole laundry corner, during a renovation. It uses only the rates and the programme already published on this site. It does not tell you which machine to buy or how much a tap or a waste point costs, because we do not publish prices for those and they depend on your flat. What it covers is the part a contractor can tell you: what has to be settled, in which week, and what to ask before anything is covered up.
The short answer
A washing machine needs three things in the same place: water in, water out and power. Choose the machine, or at least the type of machine, before the plumber and the electrician start. Put the tap, the waste point and the socket where the machine will actually stand, at the height it will actually stand at, with the tap reachable. Do it before the waterproofing and the tiling, because after that every change means breaking finished work.
Step one: decide the machine before you decide the corner
Where the machine can go depends on what it is. Settle these first, and write the answers down for your contractor.
- Front-loader, top-loader or a washer and dryer stacked. A front-loader needs room for the door to swing open and for you to bend to it. A top-loader needs clear space above it for the lid. A stack is tall, and it changes the height at which the tap, the waste and the socket should sit.
- Standing on the floor or on a base. The photo above shows a base with drawers. A base brings the machine up to a height that is easier on the back and gives you storage, but it changes every height in the next section.
- Inside the kitchen, in the service yard, or in a cupboard. Each has a different answer to where the water goes if something leaks, and we come to that below.
- The model, if you can. Every washing machine comes with an installation sheet that gives the water inlet position, the length of the hoses, the maximum height of the waste hose and the electrical requirement. We do not publish those figures, because they are different for every model. Ask the shop for the sheet, or at least for the model number, and give it to your contractor and electrician before first fix.
Step two: the tap, where the water comes in
The tap that feeds the machine is a small fitting in the wall and the most commonly misplaced thing in the corner.
- Height. Set it for the machine as it will stand. If the machine sits on a base, the tap that is right for a machine on the floor is too low, and the hose is dragged across the back of the machine.
- Reach. You should be able to turn it off without moving the machine. A tap that sits behind the machine, or behind a fixed carpentry panel, is a tap nobody turns off, and then a hose that fails is a flood rather than an inconvenience. We make the same point about isolating valves in our post on plumbing work in a renovation.
- Side. Look at your installation sheet for which side the inlet is on, and check that the hose will not kink as the machine is pushed back into place.
Step three: the waste, where the water goes out
This is the one that is hardest to change, because the waste runs under or inside what is finished last: the floor.
- Where the hose ends. The waste hose either goes into a dedicated waste point in the wall or runs to a floor trap. Ask your contractor which it will be in your flat and why, and ask to see the point marked on the drawing.
- Height. The installation sheet gives the maximum height for the waste hose. A machine on a base sits higher, so check that the waste point is still within what the sheet allows. If you do not have the sheet yet, do not let anyone fix the waste height on a guess.
- Where an overflow goes. Wet areas are built so that water runs to a trap rather than to the door. Ask what happens if the hose comes off or the machine overfills: where does that water go, and does the floor fall towards it? In a corner that is not a wet area, a leak simply spreads.
Waste runs work on gravity and fall, nothing else, so a waste point is one of the least flexible things in a flat. That is why we say to settle it before the layout is agreed, not after the tiles are chosen.
Step four: the socket
The machine has to be plugged in, and the socket has to be where the machine can be reached, not where it is convenient for the wall.
- Position. A socket directly behind the machine is a socket you cannot get at to switch off. Beside the machine, or at a height clear of the machine and of any water, is easier. A tall stack changes this, too.
- Whether it is a standard point. Our room cost calculator lists $90 for a power point and $90 for a light point. It also lists a separate rate for an isolated power point for an oven, hood or hob, and for a 20A isolator for a water heater. We do not publish a separate price for a washing machine point, so ask the electrician whether your machine needs a standard point or something more, and get the answer on a line of the quotation. The wiring itself is done by or under a licensed electrical worker, as we explain in our post on electrical work and the licensed electrical worker.
- Light. If the corner is a cupboard or a yard, ask whether there is a light in it. A light point is on the same list and is easy to forget.
Where it sits in the programme
On our published 4-room programme, a full renovation runs like this.
- Week 1: hacking and demolition.
- Weeks 2 to 3: masonry, plumbing and electrical. This is when the tap, the waste point and the socket go in.
- Weeks 4 to 5: waterproofing and tiling.
- Weeks 6 to 7: carpentry installation.
- Week 8: painting, doors, hardware and handover.
Three things follow. First, the machine decision has to be made before week 2, and not when the machine is delivered. Second, a base or a cupboard built in carpentry is installed in weeks 6 to 7, after the pipes are buried and the tiles are down, so the pipes have to be placed for the finished carpentry, not for what is there when they go in. The carpenter measures late; our post on when the carpenter should measure explains why, and the order in which trades follow each other is in the order of works post. Third, carpentry is built in a factory to the drawing, so the drawing has to show the machine, the base, the tap and the socket together before it is signed.
The carpentry rate we publish is $400 per foot run, for runs up to 2.6 m high and 650 mm deep. We do not publish a separate price for a washing machine base or cupboard, so how it is measured and priced is for the site visit.
Waterproofing: the reason this has to be early
Every pipe or socket box that comes through a waterproofed floor or wall is a hole in the thing that is meant to keep water in. Our room cost calculator treats a service yard as a wet area, and its tiling rate of $11.80 per sqft is labour including waterproofing and a 24-hour ponding test for wet areas. The order that works is the one we describe in our guide to the ponding test before tiling: pipes in and final, waterproofing applied, tested, and only then tiling. If a waste point or a socket is added after the test, somebody is cutting into a membrane that has already been proved, and nobody retests it.
Hacking and plumbing are quoted as a lump sum on the free site visit, because they depend on your existing layout. So the price for moving a washing machine point in your flat is also for that visit, not a number we can give you here.
Questions to put on the quotation
- Which machine, or which type of machine, is this drawn for, and have you seen its installation sheet?
- Where are the tap, the waste point and the socket on the drawing, and at what height from the finished floor?
- Are those heights for the machine on the floor or on a base?
- Can I reach the tap to turn it off without moving the machine?
- If the hose comes off or the machine overfills, where does the water go?
- Is the socket a standard power point, and is it priced as one?
- Is the waste point in place and final before the waterproofing is done?
- What happens to the price if I change the machine after the drawing is signed? (A change after the drawing is signed is a variation order; see our post on variation orders.)
What to do this week
- Decide the type of machine and where you want it, and write down whether it is on the floor or a base.
- Ask the shop for the installation sheet, or at least the model number.
- Photograph the corner where the machine is now: the tap, the waste, the socket and the floor trap.
- Take the photographs and the sheet to your contractor before first fix, and ask for the three positions to be shown on the drawing.
We are an HDB Licensed Renovation Contractor, HB-09-5667H. Planning where the machine goes? WhatsApp us on 9107 2601 with your flat type, your estate and the type of machine, and we will arrange a site visit to look at the tap, the waste point and the socket. Any price depends on that visit. The published programme and figures are on our 4-room HDB renovation cost page, you can run the published electrical and tiling rates on the room cost calculator, and our other services are on the HDB renovation contractors page.
Related reading: plumbing work and the licensed plumber · ponding test before tiling · order of works