
Fridge Recess in an HDB Kitchen, Singapore: Door Swing, Air Gap and Socket to Settle Before the Carpenter Draws
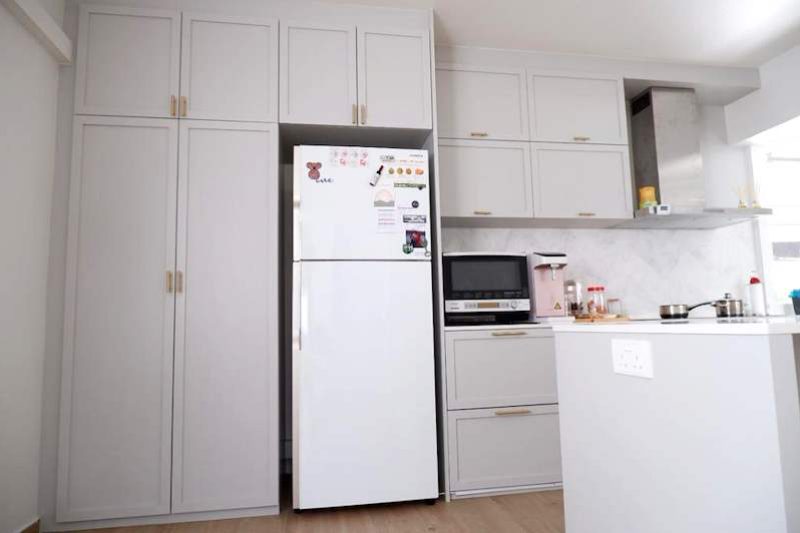
Pictured above: a white shaker-style HDB kitchen from our project archive. A tall cabinet stands on the left, and the fridge sits in its own open recess with a cabinet bridging across the top of it. Beside it are a short run of drawers, a cooker hood over a marble-look splashback, and a low counter with a socket plate on its end. The fridge looks like something that was simply carried in. The recess was drawn around it, and the gap, the door and the plug were all settled weeks earlier.
The fridge is the one big appliance that nobody thinks of as "built in". It is bought separately, it arrives in week eight or later, and it is delivered by people who just want to leave. Yet the carpenter has to make a recess for it, a tall cabinet usually has to sit next to it, and the electrician has to put a plug somewhere that is still reachable after it is pushed in. If any of those three is guessed, you find out on delivery day, when the fridge will not go in, or will not open, or cannot be switched off at the wall.
This guide is for an HDB owner who wants the fridge to go in first time. It uses only what this site already publishes: our 4-room programme, the rates on the room cost calculator and our kitchen package ranges. It gives no price for a fridge or for the recess on its own, because we do not publish one.
The short answer
- Name the fridge by model before the carpenter draws. Its width, depth and height, and the space it needs around it, are on the maker's installation sheet. A showroom "about this size" is not enough.
- The recess is made from the real fridge, not from a standard slot. Fridges of the same capacity differ in depth and in how far the door swings.
- Check the door against the wall and the tall cabinet. A door that stops at the wall cannot open far enough to pull out the drawers inside.
- Leave the air gap the sheet asks for. A fridge pushed tight into a closed box gives its heat nowhere to go.
- Put the plug where you can reach it after the fridge is in. A socket hidden behind the fridge is a socket you cannot switch off, and exactly the kind of socket our handover check tells you to test.
Why the fridge is decided weeks before it arrives
On our published 4-room programme, masonry, plumbing and electrical work are weeks 2 to 3. Waterproofing, tiling and the ceiling are weeks 4 to 5. Carpentry installation, where the kitchen cabinets and any tall unit are fitted, is weeks 6 to 7, and painting, doors, hardware and sanitary fittings are week 8. Those are the stages of a full renovation of a 4-room flat; the timing for your own flat depends on its scope.
Place the fridge in that. Its plug is wired in weeks 2 to 3, long before any fridge is in the flat. The cabinets that frame its recess are made in our factory from measurements taken after the walls and tiles are finished, and fitted in weeks 6 to 7. So the position, the size and the power of the fridge are all fixed at the start, and the fridge itself turns up at the end. If you choose it after the wiring is done, you are choosing a fridge to fit a recess someone else measured and a plug someone else placed.
Our published guidance on kitchen cabinets says the same thing from the carpenter's side: measure after the plaster and tiles, and only after the sink, hob, hood, oven and fridge have been chosen by model. You do not need to have bought the fridge. You do need its model number and spec sheet before the carpentry drawings are signed.
What the recess needs to know about the fridge
We do not quote dimensions here, because they differ from model to model and the maker's sheet is the authority. What to ask for, and to have the carpenter check against the sheet before drawing:
- Width, depth and height of the fridge itself, and whether the depth includes the handle or the door.
- The clearance the maker asks for at the sides, the back and above. Fridges give off heat and generally need air to move around them. The sheet says how much, and a recess made without it is a problem you only find when the compressor runs all day.
- Whether the fridge sits flush with the cabinet beside it or stands proud. Many are deeper than a standard kitchen cabinet, and a fridge that stands out from a run of cabinets is a design decision as much as a measurement.
- The height of the box above it. The photo shows a cabinet bridging over the fridge. That cabinet has to leave room for the fridge to come in, and for air to leave the top.
The door swing: the thing a showroom does not show
A fridge door has to open far enough to use what is inside, and that is further than it takes to look in. Two places to check on the drawing:
- The hinge side against a wall or tall cabinet. If the hinge side is jammed against a wall, the door may only open to a narrow angle. You can reach the shelves, but the crisper drawers will not pull out past the edge of the door. Many fridges let the door be hung from either side; check which, and say which side you want before the cabinet is made.
- The handle of the cabinet beside it. A fridge door that swings into a cabinet handle marks the door and the handle. Ask the carpenter to draw the fridge door open, on the same plan, next to the cabinet doors open.
The plug: where it goes and what to ask for
Three things catch people out:
- A plug behind the fridge that you cannot reach. If the only socket is directly behind the fridge, the fridge has to be pulled out to switch it off or to unplug it before a clean. Put the socket where the plug will still be reachable, to the side or above, and say so before the electrician starts. Our handover inspection tells owners to plug into every socket, including the one behind the fridge, because it is the one nobody tests.
- A socket in the wrong place for the fridge you buy. Fridges differ in where the cable comes out. The sheet shows it; a position drawn from a showroom photo is a guess. What the fridge needs to be connected to is a question for the licensed electrician, with the sheet in hand.
- The wrong line on the quotation. On the room cost calculator an ordinary power point is $90, and it is always a double 13A point. The isolated point at $150 is listed for oven, hood or hob; the fridge is not named there. So ask your contractor in writing which line the fridge point is counted under, and whether it is a new point or an existing one that stays.
If your plan has a water point for a fridge that makes ice, treat it like the washing machine in our laundry guide: the tap and the drain are settled before the tiler starts, not after.
The cabinet around it
The fridge itself costs nothing in carpentry, but the cabinets that frame it do. The room cost calculator lists carpentry at $400 per ft run for work up to 2.6m height, and a countertop at $150 per ft run up to 650mm depth. A full kitchen cabinet set of around a 4-metre run costs $3,500 to $8,000 on our 4-room page. Ask how the box over the fridge and any tall cabinet beside it are counted in your own quotation, whether by length or as a separate item, because a tall cabinet next to a fridge is the part of the run that is hardest to compare between two quotations.
If you are buying the fridge yourself
Buying your own appliances is perfectly fine. It changes who owns the problem when the fridge arrives late, arrives damaged, or does not match the recess that was made for it. If you supply it, give the model number and the sheet to the contractor before the electrical stage, and write the delivery date into the programme. We have written about what supply-only really costs.
What it costs
We do not publish a price for a fridge recess, so we do not give one here. What is published: a full kitchen cabinet set of around a 4-metre run costs $3,500 to $8,000, and as a standalone package a kitchen renovation runs $8,000 to $25,000. Where your kitchen sits in those ranges depends on a site visit, and the fridge model is one of the things we will ask about at it.
Checklist before the carpenter draws
- Fridge model chosen, with its installation sheet in hand.
- Recess width, depth and height drawn from that sheet, with the maker's clearances at the sides, back and top.
- Hinge side chosen, and the fridge door drawn open beside the cabinet doors, next to the wall.
- Plug position drawn on the same page as the recess, where it can still be reached with the fridge in place.
- The line on the quotation that counts the fridge point checked in writing.
- The box above the fridge and any tall cabinet beside it priced and described in the same way as the rest of the run.
- Delivery date of the fridge written into the programme if you are supplying it.
Planning the fridge in your kitchen? WhatsApp us on 9107 2601 with your flat type, your estate and the fridge you have in mind, and we will arrange a site visit to go through the recess size, the door swing and where the plug goes. Any price depends on that visit. You can run the published carpentry and electrical rates on the room cost calculator, see the published 4-room programme on the 4-room HDB renovation cost page, read how we handle kitchens on our HDB renovation contractors page, and see more kitchens in our project photos. We are an HDB Licensed Renovation Contractor, HB-09-5667H.
Related reading: when the carpenter should measure kitchen cabinets · built-in oven: tall unit, power point and gaps · cooker hood: socket, duct and fixing · washing machine and laundry area · electrical work and the licensed electrician · buying your own materials: what supply-only really costs