
Water Heater in an HDB Bathroom, Singapore: Instant or Storage, the 20A Point and Where It Goes Before Tiling
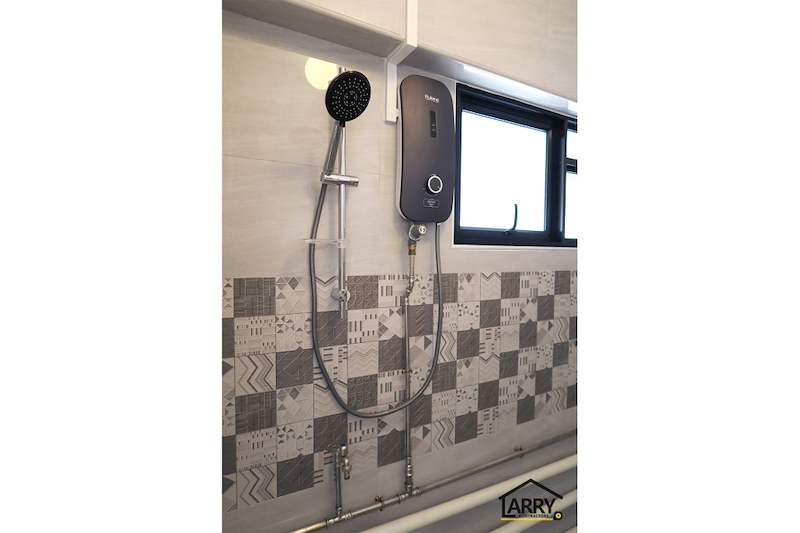
Pictured above: an instant water heater fixed to a tiled wall beside a black-framed window, with a hand shower on a rail next to it and two pipes running up the wall to the heater, from our project archive (C04). The heater is a small box on the wall. What holds it up is a power point, two pipes and a fixing that all had to be settled before the wall was tiled.
In most bathroom renovations the water heater is the part nobody thinks about until the bathroom is nearly finished. The owner says "instant heater, please", the tiler finishes the wall, and then someone asks where the heater plugs in, where its pipes come out, and whether the shower rail leaves room for it. By then the pipes are buried, the wall is waterproofed and tiled, and the only way to move anything is to open the wall.
This guide is for an HDB owner who is about to renovate a bathroom and wants the hot water to work first time. It uses only what this site already publishes: our single-bathroom process, the 4-room programme, the electrical rates on the room cost calculator, and what our guides say about the licensed trades. It gives no price for a heater, because we do not publish one. What it covers is what the heater needs from the wall, and the order the decisions have to be made in.
The short answer
- Choose instant or storage before the electrician's first fix. Our plumbing guide says this is not only a plumbing choice: it changes the electrical requirement and where the supply has to be.
- The heater needs its own electrical decision. On the room cost calculator, a 20A isolator for a water heater is a separate line at $250, against $90 for a light point or a power point. Ask which line your quotation uses for the heater.
- The pipes go in before the waterproofing, not after. Every pipe through a waterproofed wall is a hole in the waterproofing, so the positions have to be final before the membrane goes on.
- Fix the shower rail, the mixer and the heater as one layout. They share one wall, and their heights are set inside the wall at first fix.
- A gas water heater is a different job. It needs a Licensed Gas Service Worker, and a heater outdoors needs HDB's approval.
Why the heater is decided weeks before it is fitted
Our published process for a single bathroom runs roughly like this: about 2 days of hacking, 5 days of plumbing and electrical re-routing, 1 day of waterproofing, 1 day for the mandatory ponding test, 6 days of tiling, 3 days for sanitaryware and vanity, and 3 days for the false ceiling and final fittings. A single bathroom takes 2 to 4 weeks. In a whole-flat job, the 4-room programme puts plumbing and electrical in weeks 2 to 3, waterproofing and tiling in weeks 4 to 5, and painting and handover in week 8.
Read that against a water heater. Its power and its water pipes are wired and run in the early days. The wall behind it is waterproofed and tiled after that. The heater itself comes late, onto a wall that is already finished. So the position of the heater is fixed in the first week of a bathroom, and the heater is chosen to suit a hole that someone else made. If you only choose the model after the pipes are in, you are choosing it to fit what was already there.
Instant or storage: what the choice changes
We are not going to tell you which one to buy, and we do not quote a size or a rating for either, because those differ from model to model and the maker's installation sheet is the authority. What we can say from our own guides is what the choice moves:
- The electrical requirement. The plumbing guide is direct that the choice changes it, which is why it has to be known before the electrician starts.
- Where the supply has to be. The pipes and the power both have to arrive where this particular heater will hang.
- What the wall has to carry. Ask the seller for the model's dimensions and fixing details, and give them to the contractor, not a description.
If you are not sure which type you want, ask for the installation sheets of the two or three models you are considering before the layout is drawn. A drawing made from a showroom photo is a guess.
The power: what to ask the electrician
The electrical side of a water heater has three questions, and none of them is awkward.
1. Which line is it on the quotation? The calculator lists a 20A isolator for a water heater at $250, and a light point and a power point at $90 each. They are priced as different items. Ask whether your quotation counts the heater as an isolator, a power point or something else, and what that line includes.
2. Is the supply enough? Our electrical guide names water heaters among the loads, with an induction hob, an oven and several aircon indoor units, that an older flat may not have been wired for. Whether the supply capacity needs upgrading is a question for the licensed electrical worker, asked in advance, because discovering it after the work is closed up is the expensive order. If the flat is also getting more aircon or an induction hob, ask for the whole load to be looked at once, not heater by heater.
3. Who is the licensed electrical worker? HDB's guidelines say you must engage an EMA licensed electrical worker for electrical work in your flat. Ask for the name and licence number in writing before the work starts. Ask who applies for any permit, and whether the application to SP Services for testing will be made on completion. A heater that makes hot water is not evidence that the installation was tested.
Where in the bathroom the heater and its isolator may safely sit, relative to the shower and to water, is a decision for the licensed electrician. Ask them to mark it on the drawing rather than choosing it on the day.
If you are choosing gas
Some owners keep a gas water heater. Our gas pipe works guide sets out HDB's rule: installing a gas water heater needs a Licensed Gas Service Worker and has to comply with City Energy's requirements, and if you are thinking of putting one outdoors, HDB says outdoor installation is subject to HDB's approval. The renovation contractor coordinates around that worker. The carpenter, the plumber and the tiler do not touch the gas pipe. If you are changing from gas to electric, or the other way, settle it first, because it decides who comes to the flat and what has to be run to the wall.
The water: pipes, waterproofing and the order that works
The plumbing guide lays out the order that works for any wet-area pipe, and the heater's pipes are no exception:
- Pipework in, with all penetrations final. Not "final except one we might add". A heater and a hand shower on the same wall are two sets of penetrations.
- Waterproofing applied and dressed around every penetration. Our published process is two coats of approved membrane on the full floor and 1.5m up the wet walls.
- The 24-hour ponding test before any tile goes down.
- Only then, tiling.
A membrane that went on before the penetrations were final has been cut into afterwards, and the plumbing guide notes that wet-area failures concentrate at exactly those points. A late change to the heater's pipes is that situation. Concealed runs should also be pressure-tested before they are covered, and the plumbing guide's advice is to photograph every run, wall by wall, with something in frame for scale. Keep those photographs: in three years, when someone wants to fix a bracket or drill into that wall, they are the difference between drilling confidently and drilling into a pipe.
The heater, the shower rail and the window share one wall
In the photo, the heater, the hand shower rail and a black-framed window all sit on one wall, above a band of patterned tile. That is a normal arrangement in an HDB bathroom, and it shows why the layout has to be one drawing rather than three decisions:
- Heights are set inside the wall. The plumbing guide says rain shower and mixer heights are fixed at first fix, so decide with the actual fittings in hand: "standard height" is not a standard across products.
- The heater's fixing is drilled through whatever is on the wall. Floor-to-ceiling tiling is standard in our bathroom scope, so the fixing goes through tile unless it is marked before the tiler starts. Ask for the positions to be marked, and ask the tiler to know where they are.
- Check the window. Make sure the window can still be opened fully, its handle reached and its grille cleaned with the heater in place.
- Know how it is reached later. Ask where the isolator is, how the heater is switched off, and how it is serviced or replaced without opening the wall.
Buying resale or inheriting a flat
If the flat already has a heater, find out before you plan. Our resale guide says to agree in writing what stays: if the sellers are taking something you wanted, like the water heater, you want to know now. If it is staying, our inherited-flat guide notes that warranty documents for a water heater occasionally still have life in them, so ask for them. And whichever way it goes, an older flat was wired for a smaller load, so the supply question above applies even if you are only swapping like for like.
What it costs
We do not publish a price for a water heater, so we do not give one here. What is published: the 20A isolator line at $250 and the $90 light and power points on the room cost calculator, and a single-bathroom job that takes 2 to 4 weeks. Where your bathroom falls depends on a site visit, and the heater type is one of the things we will ask about at it. If you supply the heater yourself, that is perfectly fine, but it changes who owns the problem when it arrives late or does not match the hole that was prepared for it. Give the model number and installation sheet to the contractor before the electrical stage.
Checklist before the plumber and electrician start
- Instant or storage, or gas, decided, with the installation sheet of the model in hand.
- Heater position drawn from a fixed wall, together with the shower rail, the mixer and the window.
- Electrical line for the heater checked on the quotation, and what it includes.
- Supply capacity checked by the licensed electrical worker, for the whole flat's load.
- Name and licence number of the licensed electrical worker, and of the gas worker if gas, in writing.
- All pipe penetrations final before the membrane goes on, and the 24-hour ponding test done before tiling.
- Fixing positions marked on the wall before tiling, and photographs of every concealed run.
- How the heater is switched off, reached and replaced, answered in writing.
Planning the hot water in your bathroom? WhatsApp us on 9107 2601 with your flat type, your estate and the heater type you have in mind, and we will arrange a site visit to go through where the heater, its power point and its pipes go. Any price depends on that visit. You can run the published electrical rates on the room cost calculator, read the full bathroom process on our bathroom renovation contractors page, see the published 4-room programme on the 4-room HDB renovation cost page, and see more of this flat in our project photos.
Related reading: plumbing work and the licensed plumber · electrical work and the licensed electrician · gas pipe works and the Licensed Gas Service Worker · bathroom vanity and mirror: basin pipe, tap and mirror light point · the ponding test