
Renovation Contractor in Singapore: How to Check Past Work, and What Finished Photos Cannot Show
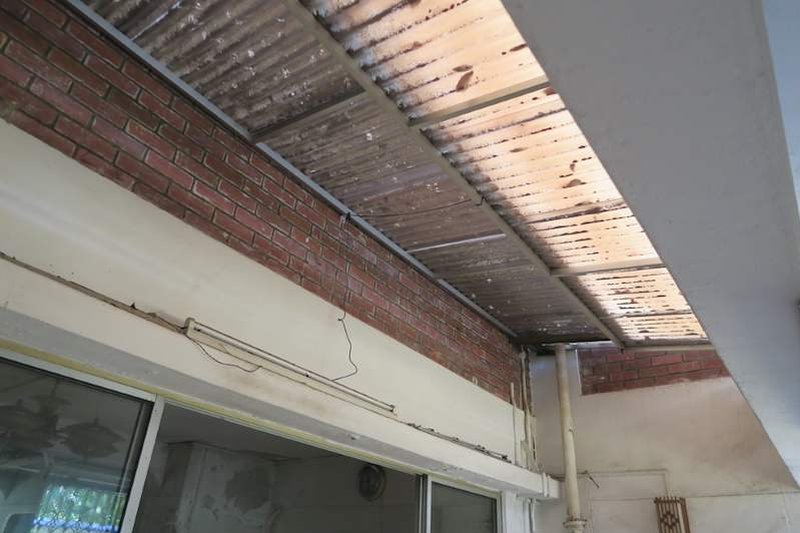
Pictured above: a before photo from one of our HDB flat projects. Rusted corrugated cladding sits under the external beam above the windows, with the brick wall exposed. The matching after photo in our portfolio is captioned: new white cladding sheets fitted under the external beam above the windows. A pair like this tells you what was there and what was done about it.
Most people check a renovation contractor by looking at photos of finished homes. It is a natural thing to do, and it is also the weakest check you can make. A finished photo shows paint, tiles, carpentry and lighting. It cannot show the parts of the job that matter most five years from now, because by the time anyone takes the photo, those parts are behind a wall, under a floor or above a ceiling.
This guide is for an owner who has a shortlist and is looking at portfolios. It says what a finished photo can and cannot prove, what better evidence looks like, and what to ask a contractor to show you before you sign. It gives no prices, because the question is not about cost.
The short answer
- A finished photo proves the finish, not the work behind it. Waterproofing, pipes, wiring and the screed under the tiles are all hidden once the room is done.
- Ask for dated progress photos and before-and-after pairs. They show the stages that cannot be seen later, and the pair shows what the contractor actually changed.
- Ask which parts of a photographed job the contractor did. A photo of a good kitchen does not tell you whether the contractor built it or only carried out part of it.
- Use photos alongside the licence check, not instead of it. Our guide to checking an HDB renovation contractor covers the licence and the permit.
- Agree on photographs for your own job before you sign. The best evidence you will ever have of your own flat is the record made while the work was open.
What a finished photo cannot show
Take a finished bathroom. The photo shows the tiles, the vanity, the shower screen and the lighting. Here is what our published bathroom programme says happens before any of that goes in:
- Days 1 to 2: hacking. The old tiles, sanitaryware, false ceiling and fixtures come out.
- Days 3 to 5: plumbing and electrical re-routing. The soil and waste pipes (SP and SW) are re-routed within the screed, and the water heater wiring and exhaust fan are roughed in.
- Day 6: waterproofing, two coats of membrane over the full floor and 1.5 metres up the wet walls.
- Days 7 to 8: the 24-hour ponding test, before any tiling begins.
- Days 9 to 14: floor screed, wall and floor tiling, grouting.
Everything from day 1 to day 8 is invisible in the finished photo. The membrane, the pipe positions and the result of the test are exactly the things that decide whether the bathroom leaks in two or three years, and none of them can be seen in a picture of a nicely tiled room. Our bathroom page says the same thing in its own words: skipping the waterproofing step is the single biggest reason bathroom leaks appear within two to three years of a cheap renovation.
The same is true elsewhere in the flat. On our published 4-room programme, masonry, plumbing and electrical work fall in weeks 2 to 3, and waterproofing, tiling and the false ceiling in weeks 4 to 5. A false ceiling carries concealed wiring for downlights, cove lighting and fans. Once it is closed, a photo of it shows a smooth white surface and tells you nothing about what is above it.
Three kinds of evidence, from weakest to strongest
1. A finished photo. Useful for taste and for the standard of the visible finish: straight grout lines, clean corners where the carpentry meets the wall, tidy edges where two materials meet. It cannot prove anything about the hidden work, and it cannot tell you how the job was run.
2. A before-and-after pair. Better, because it shows what the contractor changed. Our own portfolio captions work this way. A before photo is captioned with what was there, such as an old kitchen with worn laminate cabinets, and the after photo says what replaced it. When you look at any contractor's pairs, ask whether the two photos are of the same wall, from the same place. If they are not, you are being shown two different rooms.
3. Dated progress photos. The strongest, because they show the stages that disappear. Our Live Jobs page is built for this: dated site photos as each stage is done, newest first, each with a caption in plain words saying what the photo shows. The jobs on it change as the work moves on, so look at it as a record of how a job is run, not as a gallery. A caption that names the stage, for example rebar checked and cleared on site, tells you more about how a site is managed than a photograph of a finished lobby.
What to ask a contractor to show you
You do not need to be technical to ask. Put these to every contractor on your shortlist, in the same words, and compare the answers:
- Can I see a job photographed at the hacked stage? A flat or a bathroom stripped back to brick shows the starting condition, and it is the stage most owners never see because the work is done while they are at the office.
- Can I see the waterproofing photographed before the tiles went on? For a bathroom the membrane should be visible on the floor and up the walls, with a date on the photo.
- Can I see a ponding test photographed with the water level marked? Our guide to the ponding test explains the pencil mark and the dated phone timestamp. If a contractor has never photographed one, ask how they record that it was done.
- Which of the trades on that job did you do yourselves? A contractor with its own teams answers this one in a line. If the work was passed to others, our guide to subcontracted trades says what to ask next.
- Is the job in the photo the same size and type as mine? A photo of a big landed house tells a flat owner little about how a 3-room flat is handled, and the reverse is also true.
- Will you photograph the hidden stages of my job and give me the photos at handover? This is the question that turns a portfolio into a record of your own flat.
Signs that a portfolio is thin
None of these proves anything on its own, but together they should slow you down:
- Only glamour shots, with no before photos and no photos taken while work was open.
- No dates, so you cannot tell whether a photo is from last month or ten years ago.
- Photos that look like stock photography or interior-design renders instead of a real flat with a real window and a real meter box.
- A contractor who cannot say which flat a photo came from, or what part of the job was theirs.
- Reluctance to describe the hidden stages at all, or an answer such as “we always do that” with nothing to show for it.
A thin portfolio does not mean a bad contractor, and a rich one does not mean a good one. It means you have less to go on, so lean on the licence check, the itemised quotation and the written scope instead.
What photos still cannot prove
Even the best set of progress photos has limits, and it is better to know them.
- They show one job, not a pattern. That is why a contractor's answers to the six questions above, given in the same way every time, count for more than any single photo.
- They do not show who is accountable. That is the licence, the permit and the written warranty. Our guide to checking an HDB renovation contractor, and the one on what a warranty should cover, are the tools for that.
- They do not replace the handover. A numbered, photographed defects list with an agreed date for each repair is what you leave the handover inspection with. Our guide to the handover inspection before final payment goes through it.
Do this week
- Open the portfolio of each contractor on your shortlist and note whether it has before photos, dated photos or any photo of work in progress.
- Write the six questions above on one sheet and send the same sheet to each of them.
- Ask each contractor to name the trades they use their own teams for.
- Check each licence number in the way our licence guide describes.
- Decide which hidden stages you want photographed on your own job, and write them on the quotation.
Ready to see how we work?
WhatsApp us on 9107 2601 with your flat type, your estate and what you plan to renovate, and ask to see the work we have photographed at the hidden stages. You can see dated site photos on our Live Jobs page and the before-and-after pairs in our portfolio, read how we work on our direct contractors page and the HDB renovation contractors page, and see the full bathroom method on our bathroom renovation page. We are an HDB Licensed Renovation Contractor, HB-09-5667H. Any price depends on a site visit.
Related reading: how to check an HDB-registered renovation contractor · toilet waterproofing and the ponding test · main contractor: who signs and who is on site · what a direct contractor means · the handover inspection